Tuesday, February 20, 2007
Color Scheme
Friday, February 16, 2007
More Progress Pictures!
Thursday, February 15, 2007
Finish: Test Panel #1
Over the last few days I've been playing around with a scrap piece of MDF, some pink paint and some Minwax polyurathane. Here is the process I used for finishing Test Panel #1:
1. Sanded MDF with 150 grit sandpaper
2. Rolled on first coat of primer
NOTE: I used an OIL BASED primer because a water-based primer will soak into the MDF and ruin it!
3. Sanded with 150 grit sandpaper
4. Rolled on second coat of primer
5. Sanded with 220 grit sandpaper
6. Rolled on first coat of paint
NOTE: I used a latex, water-based paint (made by Behr) which is OK to apply after the MDF is sealed.
7. Sanded with 220 grit sandpaper
8. Rolled on second coat of paint
At this point I was completely unhappy with how it was coming out. I had multiple particles/hairs in the paint (probably from a bad roller) and there was an unmistakable "orange peel" texture all over the place that you could feel and worse yet see. I decided to change up my strategy:
9. Sanded with 220 grit sandpaper
10. Using a FOAM BRUSH I applied a third coat of paint.
11. Applied first coat of poly (Minwax) using the foam brush.
12. Sanded with 220 grit sandpaper
13. Applied second coat of poly using the foam brush.
14. Sanded with 220 grit sandpaper
15. Applied third coat of poly using the foam brush.
16. Sanded with 600 grit sandpaper
17. Applied FINAL coat of poly using the foam brush.
Here are the "before" and "after" pics:
Not too bad I guess but there's definitely room for improvement.
Here are some extra (not so good) shots of the finished panel. The flash of the camera kind of ruins the pictures and I don't think you get a good sense of what it actually looks like unless you are standing next to it. The finish is still a bit streaky and there are a few spots where air bubbles in the poly dried leaving it a bit bumpy - you just can't see it in the pictures. That said, the bottom picture really makes the finished surface look like it is mirrored or something - check out the reflection of the paper towel! I assure you it doesn't really look like that up close.
I'm going to try a different method over the next few days on a separate panel and see if I can come up with something better. I haven't tried using a foam roller and since I kind of like the way the foam brush came out I'm going to give that a shot. I'm also hoping to talk to an actual painter or someone that works at a paint specialty shop and see what they think. I will be starting test panel #2 in a few days when I get a chance to buy a foam roller and some different supplies.
Thanks for looking!!
Tuesday, February 13, 2007
Day 10: Crazy Bezel Panel - DONE!!
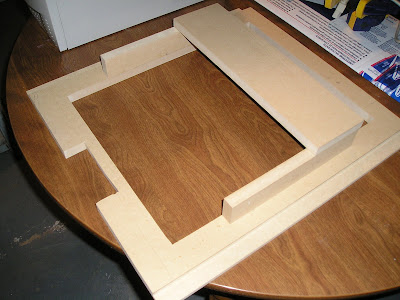
The pictures I took of this process are self-explanatory (and totally overkill!):
1. Make sure the measurement for the height of the side strips is as accurate as possible. This will determine the depth at which the monitor will sit. All of the other cuts and measurements don't need to be exact because the player will never see the framing of the monitor once the cabinet is finished.
2. Before gluing anything in place permanently make sure to test your cuts for accuracy. Place the monitor face down inside the monitor bezel panel (which should already have the rectangular cutout in it) and build the monitor frame without gluing anything. Make sure there is absolutely no spacing between the back of the monitor and the strips of MDF that stretch across the back.
3. Use clamps to glue everything together - one piece at a time. This takes longer but will produce a more accurate result.
Thanks for looking!!
Friday, February 09, 2007
Time To Get Organized
OK, I need to get somewhat organized if I am ever going to finish this project so this is going to be a detailed "punchlist" of things I have left to do.
Cabinet Construction
Cut second monitor strip to hold monitor in placeGlue monitor strips in placeRe-cut top panel to proper size (the first one is about 1/8" too short)- Glue top panel in place
- Glue bezel panel in place
Cut angled control panel pieces (3) on tablesawGlue angled control panel pieces to control panel top- Cut angled rear panel to hide speaker wire and marquee light wire
- Drill hole in rear for Smart Strip
- Prime entire cab (2 coats, sanding in between)
- Tape cabinet to accept the black paint on the interior
- Paint black section of the cabinet (3 or more coats, as necessary, sanding in between)
- Tape cabinet to accept the pink paint on the exterior
- Paint pink section of the cabinet (3 or more coats, as necessary, sanding in between)
- Add polyurethane/rubbing compound to entire cabinet for protection/shine
- Cut marquee retainer
- Install marquee
Add vinyl overlay to control panel- Install speaker covers (use screw caps)
- Install grommet for Smart Strip
- Install pink t-molding
- Cut posterboard bezel
- Install glass over the monitor
Electronics
- Install buttons and joystick
- Install DVD-ROM to computer
- Install coin door
- Install Smart Strip
- Install monitor
- Wire everything (buttons, joystick, coin door, etc.)
- Set up MAME
- Set up MaLa (front end)
- Place computer in cabinet
To Buy
- Screw caps for speaker covers
- Hinge for control panel
- Primer/Paint/rubbing compound (for finish)
- 1/4" Glass (to cover monitor)
- Black posterboard (for bezel)
- Grommet for Smart Strip plug
Wow that's a lot of things left to do! I guess the tasks are broken down quite a bit so maybe it won't take forever but I better get moving on this if I want to finish sometime in the spring.
Thanks for looking!!
Monday, February 05, 2007
So... cold... can't... work...
On Saturday I had my dad come over and help me move the unfinished cabinet from the garage to the basement. By Sunday night when I went to test fit the same piece it was snug again due to the warmth of the basement. Whew!
The big problem now is going to be painting the cabinet in the basement. I am going to try and set up some sort of paint booth made out of plastic drop cloths so I don't get the paint everywhere. I'll probably end up covering other important stuff with plastic just to be safe - I wouldn't want to get pink paint on Knights of the Arcade Table! I'll also have to make sure the booth is well ventilated to the outside somehow so I can breathe.
Anyway, I managed to cut a few of the smaller pieces to fit around the back of the monitor bezel panel which will eventually hold the monitor in place. It looks pretty good so far and my cuts were accurate enough to allow for the front of the monitor to lie exactly flush with the monitor bezel panel. I'm also playing around with the idea of physically screwing the monitor to the monitor brace. It depends whether or not the brace I'm making plus gravity holds the monitor in place with no chance of movement. There are 4 screws on the back of the monitor that don't seem to do anything so I would be able to use them to screw the monitor in place. Take a look:
I guess the next few steps are going to be setting up the computer and making sure all the vertical games you can play with 3 buttons and a joystick are working properly. I'll also have to configure the front end (MaLa) which could take a while. I'm getting so close!!
Thanks for looking!!
Monday, January 29, 2007
Progress Pictures
Thanks for looking!!
Monday, January 22, 2007
Day 9: MORE of the Crazy Bezel Panel
The first thing I did (after laying out the rectangle using a t-square and pencil) was to drill pilot holes in the corners. I picked the largest bit I had and drilled 4 holes about 1/8" inside of the lines. Next, using the holes I just cut as starting points, I used my jigsaw to connect the holes - again staying about 1/8" inside of the lines. Yoo can see the pilot holes and the crooked lines I made connecting them in the picture below.
This is the final result:
Not too bad, eh?
Thanks for looking!!
The Marquee is Here!!
My entire experience with Mamemarquees was fantastic. The service and the product are top notch. Even though I think the marquee I ordered is a little pricey it is definitely worth it. I can recommend them without hesitation to anyone else out there who wants to make their arcade cabinet really stand out. Here is a shot of the real marquee:
Thursday, January 11, 2007
The Marquee Is Ordered!
Overall, I think it's a little pricey but I also think it will be worth it in the long run. I've heard nothing but praise from everyone who uses mamemarquees so I'm excited to see the final product. This ups the total spent on the project so far to $663.52. Wow! I'm waaaaayyyy past my self-imposed $500 limit and there are still a few things left to buy.
Here's the final design of the marquee - sized properly to 6.5" tall by 18.5" wide and leaving a 0.75" edge on the top and bottom to accomodate the marquee retainer that will be used to hold it in place.
Oh yeah, I almost forgot - a HUGE THANK YOU to megashock05 for designing this awesome piece of art and putting up with me through all of the minor tweaking I had him do. I am very very pleased with how this came out.Thanks for looking!!
Monday, January 01, 2007
Happy New Year!!
Well, it's January. The last 2 months have been abnormally mild (in the 50s). If I had more free time I would have been able to get the finishing done before the weather got cold but it might be too late now. As you can probably tell, I have everything set up in my garage which is detached from the house and unheated. In order to paint it is recommended that the temperature is over 50 degrees and that's probably not going to happen for a few months. Bummer. - Bring the cabinet to the basement. It is definitely warm enough to paint down there but it would be extremely messy because I will be spraying and sanding. I would have to set up a spray booth (made out of a plastic drop cloth) because dust and overspray are definitely a concern. I also don't want anything to get caught in the vents and travel through the house.
- Keep the cabinet in the garage. It is getting cold out there but there is no wind in the garage so the temperature would be my only concern. I would still have to set up the spray booth but the problem would be allowing the paint to dry properly. I would probably have to buy a space heater and even then there's no way to guarantee the paint would dry evenly.
I'm torn but I'lll probably keep the cabinet in the garage and just deal with the weather. I'll have to be extra patient and if it takes a few more coats to get it right so be it. I'm guessing that I'll only have enought time for one coat per day once I get started (including sanding the previous coat smooth).
Anyway, the monitor should finally be arriving this week and that's the last piece I need in order to completely finish the construction of the actual cabinet before I finish it. I'm hoping to complete construction this weekend but the NFL Playoffs start (go GIANTS!!) so I'll probably be glued to the TV. Oh well!
Thanks for looking!!
Friday, December 29, 2006
Cost Breakdown to Date #4
Yikes. I ordered the monitor today from Dell. I decided to buy a refurbished one because they no longer sell (relatively) cheap LCD monitors with black trim. They come in silver now and I don't want the trim to be noticeable at all so that just wouldn't work. I'm a little nervous ordering a refurbished monitor because it only comes with a 90-day warranty instead of the 3 year warranty on new ones.I do save $30 though and from what I've heard if a refurbished monitor lasts a week with no problems it will probably last just as long as a new one. It is pictured to the right.
Anyway, here's the updated breakdown so far:
Bought:
MDF: $35.00/4'x8' sheet x 2 sheets = $70
Screws: $5.98/box x 1 box = $5.98
18" flourescent light (for behind marquee): $8.97
Wood support strips: $0.97/foot x 12 feet = $11.64
3 buttons, balltop joystick, t-molding from Dream Arcades = $32.75
Smart Strip power supply = $37.31
Hinges and magnetic clasp = $8.43
Ultimarc 360 Joystick = $59.00 (+$14.00 shipping)
Ultimarc Encoder Harness (for button wiring) = $8.00
Ultimarc Restrictor Plate (to shorten joystick throw) = $14.00
Ultimarc Hard Spring (to tighten joystick movement) = $5.00
Computer Speakers (2.1) = $21.39
Happ Small Single Coin Door = $59.95 (+$17.00 shipping)
Happ six (6) black buttons with microswitch @1.35ea. = $8.10
Happ 60" Marquee Retainer @$5.00 per 30" = $10.00
Four (4) Speaker Grills from Chokes Unlimited = $10.84
Dell 19" LCD Monitor E197FP (refurb) = $189.00 (+13.23 tax)
TOTAL so far: $604.59
To buy:
Marquee
Primer/Paint/rubbing compound (for finish)
1/4" Glass (to cover monitor)
Black Posterboard (for bezel)
I'm getting close to acquiring everything I need! Too bad I completely blew my $500 budget but I'm very pleased with the way things are coming along so far.
Thanks for looking!!
Wednesday, December 27, 2006
Control Panel Vinyl Decals: Design
Here is the final control panel design:
The entire surface of the control panel is going to be black vinyl as well as all of the admin buttons. The only color will be the pink action buttons, the pink balltop joystick and the vinyl decals. The button to the far left (currently red) is the "exit" button, and on the far right (from top to bottom) is the player 1 start, player 2 start and "pause" (currently orange).
The decals can be ordered in a bunch of colors (as shown to the left) but of course I'm going to go with the pink - The more pink the better! I want to apply the decals to each of the "admin" buttons as well as one around the joystick for decorative purposes.
The decals I ordered for the admin buttons are as follows:
A player 1 start button with the female figure (as shown to the right)- A player 2 start button with two female figures next to each other
- "pause" (all lowercase)
- "exit" (all lowercase)
In addition to the admin button decals I also ordered a "select game" decal (all lowercase) in an "overwrap" style to go above the player 1 start button. This decal will be in a 1/2 circle and "wrap" around the top of the button. The player 1 start button serves two purposes - to start each game once a quarter is inserted (duh) but also to select the highlighted game you want to play from the master list. I think this is a good solution and people should be able to figure it out. [I also ordered a "$" decal even though I'm not putting a coin button on the control panel just in case I decide to add it at a later date.]
Finally, I decided to add some decorative arrows/triangles to go around the joystick dust washer on the control panel (shown at the base of the joystick to the left). The washer will rest on top of the vinyl covered control panel and hide the hole that the shaft goes through.
Here's my ugly mock-up (in paint) of what I'm trying to accomplish - the arrows have to be spaced far enough so the circular "void" in the center clears the dust washer.
That's about it! I'm hoping the decals arrive sometime next week so I can finish the control panel.
Next up - painting and finishing the cabinet!!
Thanks for looking!!!
Thursday, December 21, 2006
Day 8: Crazy Bezel Panel
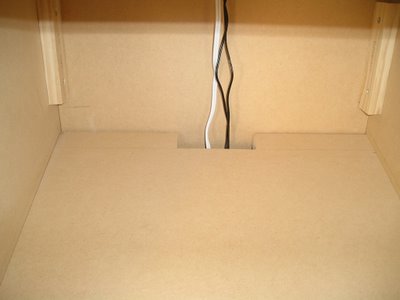
The following is a shot of the rear of the bezel panel showing the notch I cut for the wires. I just used my jigsaw to cut the notch freehand. I am going to be installing an additional panel between the marquee bottom panel and the bezel panel that will go in front of the wires and cover the notch.

A while back I installed strips of pine on the interior of the cabinet so I would have a place to rest the bezel panel (which is also on the same plane as the control panel). However, after assembling the cabinet and placing a sheet of MDF in place where the bezel panel and control panel would go I realized that I hadn't allowed space for the black cardboard bezel and glass that would eventually cover the monitor.
My solution for this was to cut a 3/8" rabbet on the sides on the bottom of the panel. This would allow the bezel panel to sit 3/8" lower than I had originally anticipated. However, since I didn't want the control panel to sit lower as well I created a 3/8" rabbet on the top of the bezel panel that the control panel could rest on. This would also create a lip between the control panel and the bezel panel so the black cardboard bezel and glass had a place to sit and the entire thing would be flush when finished. The picture below is a mock-up of what I am trying to accomplish.
As you can see, I am going to use the control panel as a lip for the glass and cardboard bezel to rest on. Once they are installed the entire surface should be uniform.
The next pictures show how I cut the bezel panel. The close-ups are of the side showing the rabbet cut which allows the panel to sit 3/8" lower than I had originally planned (creating the space for the cardboard bezel and glass).
The next picture shows the front rabbet across the width of the cabinet.